Description
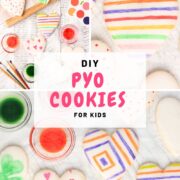
Paint your own cookies or PYO cookies ... kids LOVE them! That said, purchasing them is expensive, especially if you are planning the activity for a crowd. This tutorial will walk you step-by-step through how to make your own budget friendly version of this creative + edible craft.
Ingredients
Ingredients:
- prepared cutout cookies - use your favorite recipe and cookie cutters. This is my favorite no chill cut out cookie recipe.
- prepared royal icing - this can be store-bought or homemade. This recipe is great. You want your consistency to be loose/medium.*
- gel food coloring in 4 assorted colors *
- 8 teaspoons pure vanilla extract
- small food safe paint brushes
- small condiment sized bowls or disposable cups
Instructions
Apply Royal Icing:
- Pour royal icing into a small, shallow bowl. I really the bowl will be about 2 inches wider than your biggest cookie. This will make sure the royal icing is as "deep" instead of spread out so you can ice more cookies.
- Stir the royal icing before dipping each cookie. This will help to eliminate air bubbles on the surface of the icing. It also helps to avoid the icing forming a thin crust across the top layer.
- Hold old the edges of the cookie and carefully dip it into the royal icing. You do not want the icing to get on the sides of the cookie. Gently lift the cookie from the icing, allow excess to drip and then flip the cookie over.
- Gently shake the cookie to ensure that the icing covers the entire surface. It will be bumpy and uneven. Lay the cookie on a flat surface. If icing begins to run over the edges of the cookie, you used too much. Use a clean finger to wipe it away.
- Use a clean toothpick to pop any bubbles that rise up to the surface. This will ensure a smooth painting surface. You may have to repeat this 1-2 times. Do not stress about small bubbles ... these cookies will be painted.
- Allow the royal icing covered cookies to dry overnight. Do not try to apply a design or stack the cookies on top of each other for at least 8 hours. Drying time will vary depending on how thick the applied icing is.
Make and Apply Paint - if using purchased PYO palettes skip this step and see notes.
- Place a few drops of a single color of food coloring into each bowl. Add 2 teaspoons of vanilla extract and mix.
- Use a small food safe paint brush. Dip brush into the color you want to use, press bristles against the side of bowl to get rid of any excess water (important or colors will bleed). Paint cookie. Rinse brush between each color change or use a separate paint brush for each bowl.
Notes
Loose/Medium Royal Icing - run a clean knife through your mixed royal icing. It should take 6-8 seconds for the surface to become completely smooth again. If it takes longer, add water 1 tablespoon at a time. If it take less than 6-8 seconds, add powdered sugar 2 tablespoons at a time until you reach the correct consistency.
If you would prefer to purchase your paint palette instead of using gel food coloring, The Cookie Countess makes lots of fun colors. I have used these palettes and they are fantastic. Follow directions on the back of packaging to paint your cookies.
- Prep Time: 10 minutes
- Cook Time: 0 minutes
- Category: Baking
- Method: No Bake
- Cuisine: American