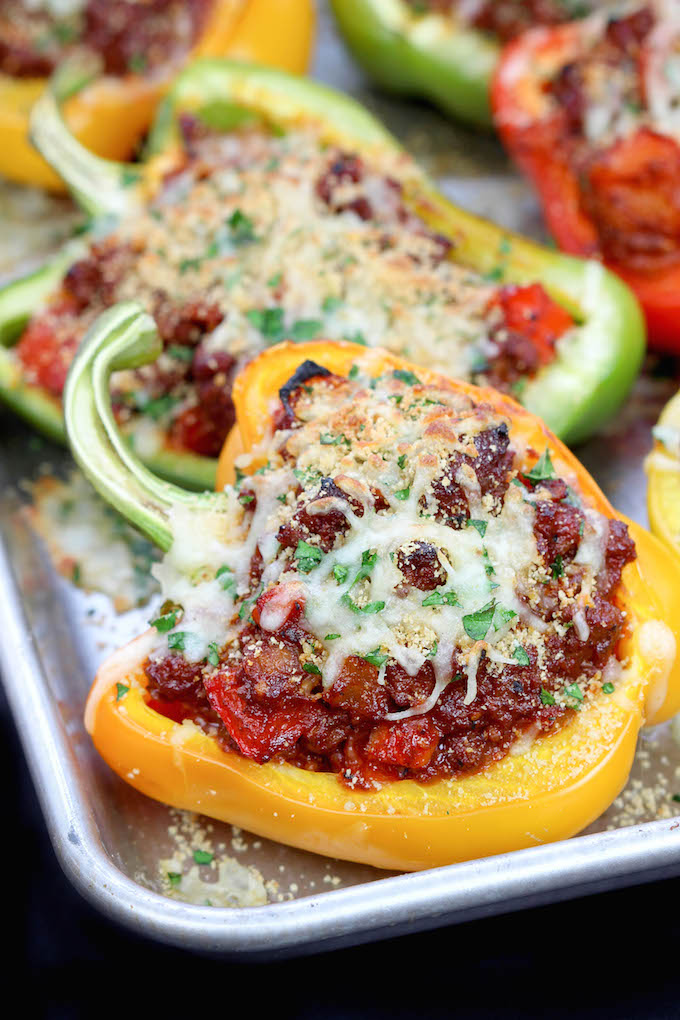
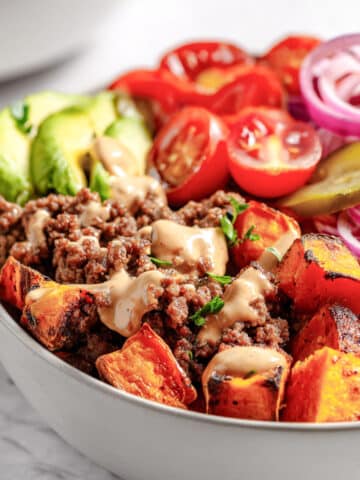
These BBQ Burger Stuffed Peppers topped with parsley, melty mozzarella, and toasted bread crumbs are making Mondays everywhere a little less BLAH!
As a rule, I am not a fan of Mondays. Mainly due to the fact that Joe goes back to work. You see, Joe's the fun Dad. When he's home there is lego building, roller-coaster riding (don't even ask), wrestling, matchbox car racing, and who knows what else. Of course, I do those things too, but somehow it's just better with Dad.
Best part, while all of these exciting endeavors are going on.. I get a little TIME. Not the kind of time that allows me to make the weekly grocery shopping trip or head to the mall in search of jeans that actually fit, but enough time to run a simple little errand or drive to Starbucks for a coffee without being missed. You know, the types of things that people do without thought in their pre diaper, car seat, tiny shoes and dirty diaper worlds. If there is one thing that having children will make you appreciate, it's that alone time is sacred.
Sooo, I'll be the first to admit.. I start grieving the the end of the weekend before it actually ends.
Here's a tip I've discovered...
If you don't have to cook dinner, Monday sucks less.
This weekend while Joe and the boys were bonding over testing out our new snowblower, I had the kitchen to myself. Yep, no angry toddler, no bickering, no wanting, no refusing, no questions. Just me and The Dixie Chicks (<-- yep, still love em) cooking.
You guys, this is how Monday dinner was meant to be prepared.. Not. On. Monday.
The result of this impromptu kitchen session.. these BBQ Burger Stuffed Peppers, which are quite fantastic.
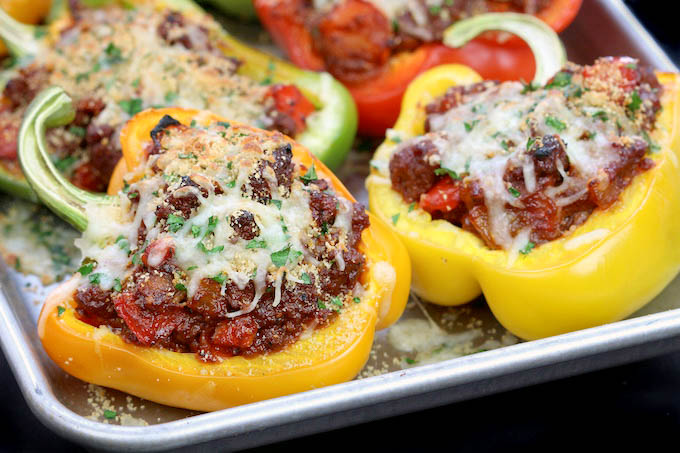
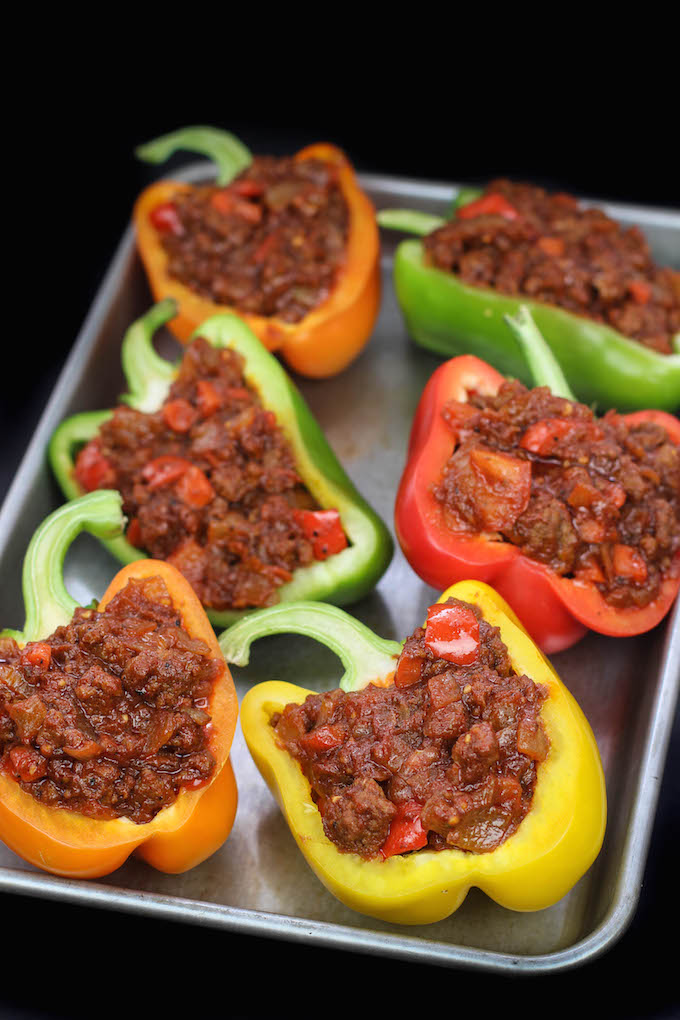
So what I did here was all pretty simple. I cooked up some beef and made my own version of BBQ sauce (healthy of course) with some tomato sauce, red wine vinegar, honey, and a little spicy steak seasoning for a bit of kick. You simmer the sauce with ground beef, onion, carrots, and red peppers, and it’s like your mom just made a good old bbq burger for you. Top these babies off with a bit of melty mozzarella, toasted bread crumbs, and a hint of parsley.. well, Monday doesn't suck anymore as much ?.
Time Saving Tips and Tricks:
Prep: These peppers are the perfect prep food. Follow the recipe as written all the way to step 4... but DON"T BAKE! Instead, cover the baking tray with plastic wrap and store in the refrigerator until dinner time! Just remove the plastic wrap and pop the tray into the oven according to the recipe. They may need to bake closer to 25 minutes since they aren't starting out at room temp. Keep and eye on em!
Make Ahead: I always want to provide helpful advice. You CAN make these peppers ahead (baked and all). They are delicious reheated. However, they aren't pretty. They get kinda wrinkly and dilapidated. If you are making them for your weekly lunches.. this is perfect. If you are hosting a dinner party... definitely better to go the prep route.
Freezer: YES! To accomplish this, follow the prep directions exactly... until the part about covering them in plastic wrap and storing them in the refrigerator. Instead, use the plastic wrap to individually wrap each pepper, place them in a large container, and store them in the freezer! When you are ready to serve, simply allow them to thaw overnight in the refrigerator and then bake according to recipe directions. They could possibly go straight from the freezer to the oven with an extended baking time, but I haven't tried this method. If you do, let me know how it goes in the comments below!
PrintRecipe
BBQ Burger Stuffed Bell Peppers - Freezable
- Total Time: 1 hour 15 minutes
- Yield: 4 servings 1x
- Diet: Gluten-Free
Description
These Philly steak and cheese stuffed peppers are loaded with shaved ribeye, caramelized onions, and a creamy two-cheese filling, packed into red bell peppers and frozen oven ready. Everything you love about a Philly cheesesteak, without the bread.
Ingredients
- 4 large red bell peppers, halved lengthwise, seeds removed
- 1 large green bell pepper, thinly sliced
- 1 lb shaved ribeye
- 4 oz cream cheese, softened
- 1½ cups low-moisture mozzarella, divided
- 1 medium yellow onion, thinly sliced
- 1 ½ cups mushrooms, thinly sliced
- 2 tablespoons olive oil
- 1 tablespoon Worcestershire sauce
- 1-2 teaspoons soy sauce
- 1 teaspoon garlic powder
- ½ teaspoon onion powder
- 1 teaspoon salt
- ½ teaspoon black pepper
- 1-2 teaspoons red wine vinegar or lemon juice
Instructions
- Prep the peppers: Halve the red bell peppers lengthwise and remove seeds. Place on a parchment-lined baking sheet.
- Brown the beef: Heat olive oil (1 tablespoon) in a large skillet over medium-high heat. Add shaved ribeye (1 lb) in an even layer. Let sit 1-2 minutes, then break apart and cook until browned. Transfer to a plate.
- Cook the vegetables: Add remaining olive oil (1 tablespoon) to the pan. Add green bell pepper, onion, and mushrooms. Cook 8-10 minutes until softened and lightly caramelized.
- Build the flavor: Return beef to the pan. Add Worcestershire sauce (1 tablespoon), soy sauce (1-2 teaspoons), garlic powder (1 teaspoon), onion powder (½ teaspoon), salt (1 teaspoon), and black pepper (½ teaspoon). Cook 2-3 minutes. Turn off heat and stir in red wine vinegar or lemon juice (1-2 teaspoons).
- Make it creamy: Fold in cream cheese (4 oz) and shredded mozzarella (1 cup) until melted and cohesive.
- Fill the peppers: Divide filling among pepper halves, packing generously. Sprinkle tops with remaining mozzarella (½ cup).
- Flash freeze: Freeze on baking sheet for 2 hours until solid. Transfer to freezer bags and freeze up to 3 months.
To Serve:
From frozen: Cover with foil. Bake at 375°F for 45-50 minutes. Remove foil for last 10 minutes until cheese is golden.
From thawed: Thaw overnight in the fridge. Bake uncovered at 375°F / 190°C for 25-30 minutes until cheese is golden and bubbly.
Notes
Refrigerate: Store leftover baked peppers in an airtight container in the fridge for up to 4 days. Reheat in a 375°F oven covered with foil for 20 to 25 minutes until heated through, removing foil for the last 5 minutes to re-melt the cheese.
Freeze (unbaked): Flash freeze assembled peppers on a baking sheet until solid, then transfer to freezer bags with as much air removed as possible. Freeze for up to 3 months. Bake from frozen at 375°F covered for 45 to 50 minutes, then uncovered for 10 minutes until cheese is golden.
Peppers can be baked and served without freezing first. Assemble and then bake at 375°F uncovered for 25 to 30 minutes until the cheese is golden and bubbly.
- Prep Time: 25 mins
- Cook Time: 50 mins
- Category: Dinner
- Method: Freezer, Oven
- Cuisine: American
Nutrition
- Serving Size: 2 stuffed pepper halves
- Calories: 525
- Sugar: 11.9 g
- Sodium: 1053.3 mg
- Fat: 33.2 g
- Carbohydrates: 21.4 g
- Protein: 37.3 g
- Cholesterol: 106.6 mg
Helpful Hints:
- To make this recipe gluten-free, skip the breadcrumbs or use a gluten free version.
- Wrap the pepper stems with aluminum foil to avoid blackening them (this is for presentation only). If you're target audience isn't into presentation... don't waste the time!
- I like to make my own steak seasoning. It allows me to control the quality and quantity of ingredients used. I like THIS recipe.
- Organic grass-fed beef can be really greasy. This adds more liquid and may cause your meat mixture to take longer than 20-30 minutes to thicken. Don't stress, it will! If you want to use grass-fed beef but cut down on the greasy factor you can brown the meat separately from the peppers, carrots and onions. Once the meat has browned, drain it and then add it into the skillet with the veggies.

DS
Hi. I am trying to make this recipe tonite for dinner and I do not see what temp the oven should be at to bake peppers. please help
Simply Sissom
You can set the oven to 350:) I hope they came out ok. I am updating the post to include that info. Thanks for pointing out that tit was missing.